Saturday, August 31, 2013

Creamy Swiss Chard on Beet "Flatbread"

Wild flowers near Box Lake in the Payette National Forest
Backpacking, Cooking and Dogs---that will be the new name of my blog if I ever decide to change. I feel so fortunate that I've been able to go on many backpacking adventures this summer. I guess you could say I've come a long way, physically, since I re-adopted the anti-candida diet last October.

That doesn't mean I don't have my issues. I follow a rigid diet and sometimes must walk a bit of a tightrope with certain foods. Some foods must be only eaten every 3-5 days. I guess you could say I still am plagued with shifting food sensitivities. I have heard that goes along with some auto immune disorders.


Creamy Swiss Chard on Beet "Flatbread"

 
I've had a great gardening summer this year. My garden is filled with the many foods I can eat, like Swiss chard, kale, and golden and red beets. I used up a lot of those veggies in an entrée I cooked while I was stove-less for 15 days. (I should write a cookbook---Stove-less in Seattle. You know a play on Sleepless in Seattle.)


It's a super simple entrée to make. You know it had to be if I made it without a stove. (Hot plates rock when you have no stove. Not.)

Here's what you need:

1 bunch of Swiss Chard or combo of Swiss Chard and Kale
1 onion, sliced
1 T. sunbutter (unsweetened)
2 small beets, peeled and sliced (I used golden and red beets.)
salt and pepper
1 T. olive oil


Here's what you do:

Peel and slice the beets. Steam until tender. (Hint: save the beet water. It makes a great energy drink with a little stevia added.) Set aside.

Wash and trim your greens. Thinly slice the onion. Fire up the hot plate. (Okay, you can skip that one and use your stove.) Heat olive oil in a large sauté pan. Sauté the onions and greens until tender. Season with salt and pepper. Spoon in the sunbutter and stir until combined with the greens.

To serve, arrange the beets in a flat layer (hence, the flatbread comparison) on a bed of mixed lettuce greens, if desired. Spoon the sunbuttery Swiss Chard on top.

It's quick to make but oh, so delicious!

"Mom, will there be frog legs for dinner?"

Recipe contributed to: http://www.rickiheller.com/2013/08/wellness-weekend-august-29-september-2-2013/
http://allergyfreecookery.blogspot.com/2013/08/its-linky-party_30.html

Thursday, August 29, 2013

Veggie medley chips: backpacking and everyday snacking


"You don't have to worry about cooking, Mom. Those doggie treats look 5-star to us."

What do you do when your stove meets an untimely end and you're without a range for 15 days? You could go out to eat every day but not if you have dietary restrictions like mine.
 
You just have to get creative. Suddenly, your barbecue and all those appliances you've kept tucked away in the cupboards become essential. So, that's how I've been cooking for what has seemed like eternity.
 
Not a lot of great entrees have emerged from my kitchen these past two weeks. But my dehydrator helped me turn a lot of veggies from the garden (Tuscan kale, zucchini, onions, radicchio, carrots) into tasty Veggie Medley Chips.
 
These chips make healthy everyday snacks plus great hiking/backpacking food. Grind some up and you have a convenient veggie broth powder without all the unpleasant ingredients found in instant, store-bought bouillon.


Here's what you need for Veggie Medley Chips:

1 bunch of Tuscan kale
1/4 head of radicchio (or substitute red cabbage)
1/2 red onion
2 large carrots
4 zucchini (use green and yellow for a more colorful chip medley)
2 T. organic tahini
1/2 tsp. garlic granules
salt and pepper
juice of 1 lemon

Veggie medley chips ready for dehydrating

 Here's what you do:

Wash all your veggies. Remove Tuscan kale leaves from stems and discard the stems. Cut the red onion into thin slices and chop the radicchio. Use a potato peeler to make carrot and zucchini ribbons. Place all the prepared veggies in a large bowl.

Make a tahini dressing by mixing tahini, lemon juice, garlic granules, salt and pepper in a small bowl.
Add other spices, herbs or even vegan parmesan cheese, if desired. Pour the dressing on the veggies and toss to distribute evenly.

Spread veggies on parchment paper-lined racks in your food processor. Use your veggie setting and start dehydrating. Start checking the veggies after 4-5 hours. The kale will get done first.

These chips are addictive but remember they are dehydrated which means you need to drink lots of water.

Party, party!
Break out the party stuff. My new stove arrived today.

Recipe contributed to: http://www.rickiheller.com/2013/08/wellness-weekend-august-29-september-2-2013/#more-20516

Thursday, August 22, 2013

Gone to sunbutter and jam heaven bars


Sunbutter and jam heaven bars


 I think I've gone to sunbutter and jam heaven!

Misha and Nika enjoy another backpacking adventure.

You can see how Gone to sunbutter and jam heaven bars are making Misha, my husky, and Nika, my malamute, smile! Actually, they love backpacking too!
 

Here's what you need for the jelly topping:
  • 3 cups blueberries and blackberries, mixed (use frozen or fresh berries)
  • stevia, to taste
  • vegans use 1/4 cup water with 1/4 cup chia seed; as an alternative, 1/2 cup water with 1 T. gelatin from grass-fed cows
  • 2 tsp. lemon zest
Here's what you need for the crust:

  • 1/4 cup coconut oil
  • 1 1/2 cups sunflower seed meal (use organic seeds, if possible)
  • pinch of salt
  • 1 T. unsweetened organic sunbutter
For the sunbutter layer:

  • 1 pear, cored and diced (no need to peel)
  • stevia, to taste
  • 1/4 cup coconut oil
  • 1 1/2 cups sunbutter
Here's what you do:

Make the jam. Pour 3 cups of berries into a saucepan. Bring to simmer with water. Add the chia or gelatin. Turn off the heat. Add the zest. Allow to cool. Puree in a food processor. Return to fridge to allow to thicken. Raw alternative: place fresh or thawed frozen berries in a food processor with chia seed and pulse until blended and thickened.

Make the crust. Grind the sunflower seeds into a meal using your grinder or food processor. Mix with other ingredients in a bowl. Press into an 8-by-8-inch square pan, lined with parchment paper. Place in the fridge to firm up the crust.

Make the sunbutter layer. Put all ingredients in a food processor and blend until thick and creamy.

To assemble, spread sunbutter mixture on crust. Place back in fridge to firm up. Finally, top with cooled jam.

Cut into bars. Store in fridge for up to one week. Or store them in the freezer.

 Now, you've gone to sunbutter and jam heaven.
Even better: bite into one of these bars while kayaking, backpacking or hiking.

Recipe submitted to: http://www.rickiheller.com/2013/08/wellness-weekend-august-22-26-2013/
http://allergyfreecookery.blogspot.com/2013/08/its-linky-party_30.html
http://wholenewmom.com/traditional-tuesday/salted-caramel-apple-crumb-bars-citrus-herb-chicken-kabobs-coconut-crumble-apple-muffins-how-to-survive-an-autoimmune-flare/


Saturday, August 17, 2013

Luscious lemon avocado fruit pizza

Even a suitcase looks like a great place to explore for Bailey.
I love my pets but now there is even more reason to love them! Children who grow up with pets in the home have a lower risk of getting allergies, according to a study. Early pet exposure may reduce allergies even for children whose parents have allergies.

The explanation may be as simple as pets help strengthen the immune system by exposing children to more and different bacteria. A not-so-clean environment may force the immune system into developing a less allergic response pattern. The theory is let the kids play in the dirt.
The study’s finding also gave encouragement for having more than one pet. A child’s risk of developing allergies was reduced more if there were two or more pets in the home. Eight percent of kids with two or more pets were allergic to cats compared to 12 percent with one pet and 15.5 percent with no pets.
Cats are curious, loveable and help prevent allergies.
 
Bailey, the cat, and his other cat friends beat out dogs in another study. Researchers found that the preventative affect of cat ownership was stronger than dog ownership. High amounts of cat allergen had preventative effects against allergies.
Luscious lemon avocado fruit flatbread


 Doesn't that information just make you love your pets even more? Something else I know you will love is Luscious Lemon Avocado Fruit Pizza, ACD friendly.

Here's what you need for 1 serving:

For the topping:

1 avocado
1 T. coconut oil
vanilla stevia or other sweetener, to taste
Juice of one freshly squeezed lemon
1 T. lemon zest
Berries, such as strawberries, blueberries
Coconut flakes

For the pizza, flatbread:

 1/3 head of cauliflower, riced
2-3 chia eggs (mix 2-3 T. of chia with 3-4 T. of warm water and allow to gel) or 1 organic egg
1/4 cup raw or toasted sunflower seeds ground into flour using a coffee grinder
1/4 tsp. salt


Here's what you do:

For the topping:

Place avocado, lemon juice and zest, coconut oil (softened) and sweetener of choice in your food processor and blend until smooth. Place in fridge to chill.

For the pizza crust:

Preheat oven to 400 degrees. Put the raw cauliflower florets into a food processor and pulse until it resembles rice. Add the chia eggs or regular egg, salt and sunflower seed flour and pulse until blended.

Put the dough onto a pan-sprayed baking sheet. Cover the dough with a large piece of wax paper and smoosh it with your hands until it's about 9-12 inches in diameter (or make two rounds instead). Place the dough in the oven and bake for 30+ minutes (or 15 minutes with regular egg) or until dry but pliable.


To serve, spread chilled avocado mixture on flatbread. Top with berries and coconut flakes.

Recipe contributed to: http://www.rickiheller.com/2013/08/wellness-weekend-august-15-19-2013/#more-19617


Sunday, August 11, 2013

Zucchini and avocado fries with chipotle dipping sauce

A new Olympic event: synchronized sleeping
Are you beginning to feel like Tarzan going into the jungle when you head into your garden to pick zucchini? I've been harvesting an abundant zucchini crop but not without some issues. I am one of those people who gets allergic contact dermatitis from coming in contact with the prickly hairs on the vines of the zucchini plants.

To prevent the rash, always wear clothing that protects your arms, hands and legs.  Treat a rash by washing the skin with cold water and a mild soap. The rash, while annoying, should go away in about an hour. If not, apply an over-the-counter corticosteroid cream to reduce inflammation and relieve the itching.

Trimming back your bushy zucchini plants may allow you to pick the squash with less contact with the leaves. Trim leaves carefully to avoid removing too many flowers or robbing growing flowers of the shade they need. Start with dead leaves first. Then, cut off additional large and outer leaves but make sure you remove the entire stalk. Another option would be to use stakes and twine to contain the zucchini plants. They will grow up rather than out.


Zucchini and avocado fries with chipotle dipping sauce
Once you negotiate your zucchini jungle, you should come back with lots of zucchini. Oven-baked fries are one of my favorite things to make with medium to large zucchini. Don't use bazooka-sized zucchini. Make these with avocado fries and you have a meal.

Here's what you need for 1 serving of zucchini and avocado fries:

2 medium or 1 large zucchini (consider using a mixture of yellow and green zucchini)
olive oil
1 small avocado
2 T. ground sunflower seed flour (or almond flour, if tolerated)
1 flax or chia egg mixed in 2 T. coconut milk or 1 egg for a vegetarian option
salt and pepper

Here's what you need for the chipotle dipping sauce:

2 T. vegan or other yogurt
2 T. sunbutter (or substitute almond butter)
1/4 cup diced onion
1/4 cup diced red pepper
1/8 tsp. chipotle chili powder


Here's what you do:

Preheat oven to 425 degrees. Line 1 large and 1 small baking sheet with parchment paper. Cut the zucchini into fry-sized pieces. Place the zucchini fries on the large baking sheet. Drizzle with olive oil and sprinkle with salt and pepper. Toss with your hands. Place the fries in the oven. Bake for up to one hour or until crispy and golden.

In the meantime, prepare the avocado fries. Cut the avocado into fry-sized wedges. In a small bowl, stir up your chia eggs or regular egg, mixed with salt and pepper. Place sunflower seed or almond flour in another small bowl. Dip avocado fries into egg mixture and then roll in seed flour. Place the fries on the other parchment-lined baking sheet. Bake at 425 degrees or  25 minutes or until brown. Flip the fries once during baking time.

Prepare your chipotle dipping sauce. Place all the ingredients in a food processor, blender or magic bullet and blend until smooth.

Recipe contributed to: http://dietdessertndogs.com/2013/08/08/wellness-weekend-august-8-12-2013/

Place a few of those zucchini fries in the bowl, please.


Looking for some other zucchini recipes:

Sunbuttery Zucchini Noodles ACD-Phase 1, vegan
http://catsinthekitchen.blogspot.com/2011/08/sunbuttery-zucchini-noodles.html

Thai stir-fry pizza on cauliflower crust ACD-Phase 1, vegan
http://catsinthekitchen.blogspot.com/2013/01/thai-stir-fry-pizza-on-cauliflower-crust.html

Zucchini and garden veggie lasagna ACD-Phase 1, vegan
http://catsinthekitchen.blogspot.com/2013/08/zucchini-and-garden-veggie-lasagna-acd.html

Zucchini Fries ACD-Phase 1, vegan
http://catsinthekitchen.blogspot.com/2011/05/zucchini-fries.html

Zucchini Nacho Hashbrowns ACD-Phase 1, vegan
http://catsinthekitchen.blogspot.com/2013/07/zucchini-nacho-hashbrowns.html

Zucchini pile-ups with cilantro pesto, ACD-Phase 1, vegan
http://catsinthekitchen.blogspot.com/2013/07/zucchini-pile-ups-with-cilantro-pesto.html


Friday, August 9, 2013

Strawberry-carrot pudding with coconut butter swirl, a backpacking favorite

Rafting on Curtis Lake
Four backpacking trips into summer and the food prep is definitely getting easier. Trail navigation is a whole other issue. On our latest backpacking trip, we unwittingly picked a high mountain lake with a trail that was not maintained. These days, it seems that trails with less foot traffic are not being maintained.

It was my first total bushwhacking adventure. Let's just say we could have used a machete or chainsaw at times. Fortunately, we had a GPS and some trail savvy members in our group. Otherwise, we might still be out there wandering in the woods.

Misha enjoys some "me-time" by the lake.
Once we made it there, the lake was so beautiful that we almost forgot the tiring trek in and the occasional thought that maybe we were lost.

Strawberry-carrot pudding with coconut butter swirl
Best of all, I was packing along a new backpacking treat that I made---Strawberry-Carrot Pudding with Coconut Butter Swirl. I enjoyed it so much I decided to make a version from fresh ingredients at home. Note: This recipe uses steamed carrots but raw carrots would work as well, especially if you have a high-powered food processor.


Here's what you need to make the fresh version:
(makes 1 large or 2 small servings)

  • 2 medium carrots, peeled, diced and steamed (or use raw carrots)
  • 6 fresh or thawed frozen strawberries
  • 2 T. coconut butter
  • 1-2 T. coconut milk

Here's what you do:

  • Steam the peeled, diced carrots (or keep it raw) and allow them to cool.
  • Toss everything into the food processor and blend until smooth and creamy.
  • You can eat this right away or chill it in the fridge.
  • Serve with additional sliced strawberries and melted coconut butter on top.


Ingredients for the backpacking version
Here's what you need to make the backpacking version:
Note: I purchased organic freeze-dried carrots and strawberry powder from www.nuts.com.

  • 1/2 cup freeze-dried carrots
  • 1 T. freeze-dried strawberry powder
  • 1 packet Artisana coconut butter (purchased from www.iherb.com)
  • 1/2 cup boiling water

Here's what you do:

  • Prepare the pudding ingredients at home.
  • Grind the carrots to a fine powder in your coffee grinder or NutriBullet-type device.
  • Mix in the strawberry powder.
  • Put the mixture in a heavy-duty freezer bag (quart-size).
  • At camp, add 1/2 cup of boiling water to the mixture in the bag. Zip up the top and allow the mixture to rehydrate.
  • When ready to eat, mix in your coconut butter.
Both versions were delicious but I think the backpacking one may have been extra good especially after our unplanned bushwhacking experience.
Our own private lake
Recipes contributed to:
http://dietdessertndogs.com/2013/08/08/wellness-weekend-august-8-12-2013/#more-18566
http://allergyfreecookery.blogspot.com/2013/08/allergy-friendly-lunchbox-love-8913.html
http://www.glutenfreecat.com/2013/08/raw-foods-thursdays-8713/

Thursday, August 1, 2013

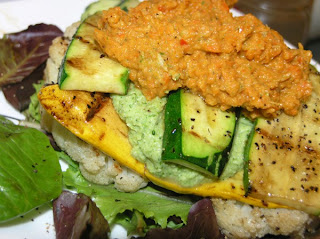
Zucchini and garden veggie lasagna, ACD-friendly

Zucchini and garden veggie lasagna
Hot weather slowed my garden's production of zucchini for awhile but now it's in full swing again. I made some Zucchini and Garden Veggie Lasagna, a healthy and ACD-friendly way to use many veggies from your garden or farmers' market.

The lasagna features layers of veggies with broccoli pesto in between and finished with a marinara sauce. You'll need two zucchini (1 yellow, 1 green or both the same), cauliflower, mixed greens, tomatoes, red pepper, carrot, onion, broccoli, and basil. That's a heap of produce in one meal.


Here's what you need for two servings:

Veggie layers:

2 zucchinis, sliced lengthwise into strips
2 cauliflower steaks

Broccoli pesto:

1 stalk of broccoli (2 cups) broken into small pieces and steamed
1 cup fresh basil
2 T. pumpkin seeds
juice of 1 lime
splash of olive oil
salt and pepper

Marinara:

1 Roma tomato, sliced in half
1/2  red pepper, sliced into strips
1 carrot, sliced into strips
1/2 red onion, sliced
1/2 cup fresh basil
salt and pepper


Here's what you do:

Preheat your oven to 400 degrees. Place the cauliflower steaks, zucchini strips, tomato, red pepper, carrot and onion on several baking sheets, lined with aluminum foil and spritzed with olive oil. Season with salt and pepper. Roast veggies for 30-40 minutes or until browned. Flip halfway if desired.

Steam the broccoli pieces for about 5 minutes until tender. After steaming, the broccoli should be cooled under cold water and drained. Place the cooled broccoli in a food processor with other pesto ingredients. Process until thick and creamy. Add a splash of water if necessary.

Transfer the pesto to a bowl. Don't bother to clean the food processor. Add the roasted marinara ingredients, after allowing them to cool a bit. Process until creamy.

For the lasagna: start with a handful of greens, next a cauliflower steak, then three strips of zucchini, some broccoli pesto, more zucchini strips, then marinara.
I love sleeping bags but not as much as Mom's cooking.

Recipe contributed to: http://dietdessertndogs.com/2013/08/01/wellness-weekend-august-1-5-2013/#more-18539